Unless you're building a really big robot, or one for robot wars, plastics are pretty much the best materials around for building a robot platform. They are easy to cut, drill, and form with simple tools, are durable and light, and available in lots of handy shapes, colors, thicknesses, and sizes.
Many plastics can be bought at your local plastics store. Make sure you check the bargain bin! Acrylics and Sintra may be available at your local sign making store.
Different types of plastic are good for different things, depending on their own characteristics.

Delrin (a.k.a. acetal) is usually black, comes in rod, block, and sheet form, and also feels kind of slick. Delrin is so gross impact resistant that they make in-line skate brake pads out of the stuff. Is is somewhat self-lubricating. It will take and hold a thread extremely well and machines superbly, but is somehow ugly in raw form. It is ideal for small, intricate structural elements. One tiny block of delrin on Elma Beaucoups has five machine screws holding various parts in place, holds one end of an axle in place, and has never shown any wear and tear or suffered from stripped threads (knock on wood.)
Acrylic (a.k.a. plexiglas, a.k.a. lexan) comes in a rainbow of colors, usually clear, in sheets, rod & tube. It is very rigid, and will also take and hold a thread pretty well. However, it is on the heavy side, mars easily, attracts fingerprints, and is hard to cut or drill without shattering, cracking, or "crazing." I used it where Sintra wasn't stiff enough for the job, like for the base.
Sintra is foam-filled sandwiched PVC used mainly by the sign-making industry. It is available in many colors in sheet form. Unlike solid PVC, it is not indestructable, but even still it is tough enough for light-duty robots, and works very well in places where you need some "give" like in joints or in mounting plates for motors (that "give" helps smooth out shaft misalignments and motor vibrations.) It is magically wonderful, very cheap, extemely light, and easy to work with. You can forget about threading it, though.

Telescoping brass tubing is widely available at local hobby shops.
Since each size tube is made to fit within the next size, this stuff makes for almost ideal axle/bearing combos.
Another good idea is to use a couple of real short pieces fit inside one other to make that gear with the 1/4 inch hole fit nicely on a 1/8 inch motor shaft with a setting screw. Although you won't get perfect alignment, it works at least well enough for use with a light-duty chain drive.
Brass tubing is also a strong, light, flexible material for making frames, and welds well with silver solder.
As if that weren't enough, brass as a material has properties which make it ideal for use in bearing systems, and works especially well when combined with nylon.

If you're like me, you have to admire BEAM roboticists for their rocket-to-the-future sensibility, and their ability to weld intricate walkers out of dumpster refuse. If so, you probably also drool over how LEGO roboticists can take their creations completely apart and start again from scratch.
But of course, if you're like me, you don't have all the cash to blow on infinite LEGO sets, hate welding altogether, and don't want to fight homeless people over dumpster treasures.
I used all 4-40 hardware for Elma Beaucoups. 4-40 is common in computers & electronics, but may be scarce in your big-old "builder's supply" hardware stores. Jameco (www.jameco.com) has great prices on 4-40 hardware, and carries 4-40 all-thread on their robotics page.
Make sure you get washers! Nylon & split lock washers in particular are necessary to keep your screws from coming out when your robot moves, jerks, shakes, wobbles, and vibrates. Nylon washers aren't available at Jameco, but are so handy for RC hobbies that you can find them in hobby shops.
Jameco doesn't carry taps & dies, and you may have to visit a couple hardware stores before you find them. When you purchase a tap, it is a good idea to check the package & buy a drill bit of the size specified on the front. Some taps work best with non-standard size holes.
The main reason to buy a die is that after you have cut a piece of all-thread, you will be left with some burrs, and probably a dulled or bent thread or two. A die is the only thing to put them back in proper shape so you can put a nut on it.
A lot of the connectors, the worm gear drive train, a shaft coupling, and even some LEDs, capacitors and resistors used for Elma Beaucoups came from an old defunct VCR. What with the tape drive system, cassette shuttling mechanics, and all those LEDs, your typical older VCR is chock full of great robot materials, and so many people have a spare aging VCR sitting around that if you ask all your coworkers & friends you should be able to get your hands on one for $25 - or for free!
My wish list: 1) A milling machine I can fit in a closet. 2) A thermal injection molding system I can keep under a futon. 3) A tabletop band saw. 4) A tabletop drill press. 5) A lathe.
The great thing about tools is that once you make the investment, you're set for life. Even still, if you're like me, you probably can't afford anything other than #4. Even still, you probably have some tools sitting around, and with a small investment can get enough to make your own home brew robot factory.
Below is pretty much all the body-making tools I had available for making Elma Beaucoups.
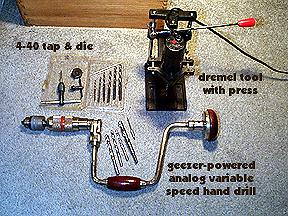
This picture here should be called "bad tools for precision jobs." After buying the dremel tool and dremel press base, I found a much better "hobby" drill press at an Ace Hardware for the same price (about $50.) Of course, I stood there drooling over it, knowing I couldn't buy it.
Problem #1 with the dremel is that it won't hold a bit thicker than 1/8 inch. Problem #2 is that it rarely drills a good, straight hole. However, it had an advantage for drilling plastic, in that it runs at a higher RPM. Also, there are tons of "hobby milling bits" made for dremel tools, so you CAN do a little really simple milling here and there when you really need to.
If you have access to a plastic store, or a really well stocked hardware store, they should have bits which are made specifically for drilling plastic. These bits will lessen the amount of mishaps you have with acrylics in particular, but are good for plastics in general, and I think worth the couple bucks they cost.
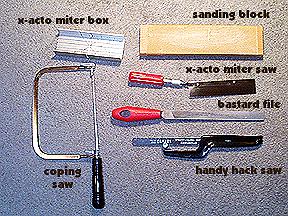
This is about all the saws & abrasives one would need for a light-duty robot. You've got your hack saw for metals, a coping saw for cutting all kinds of shapes out of sheet plastic, and an x-acto miter box & saw for cutting plastic rod at right angles.
A bastard file, actually designed for metals, is good for plastic. Get a file with one side flat, one side rounded - that way you can file all kinds of different shapes.
I tried some rougher wood-type files on different kinds of plastic, but they don't seem to work much better, and mar the surface more. Once a bastard file gets a good bite on plastic, it will cut the stuff like butter.

One thing you will definitely end up needing is a good hobby vise. The one pictured here will clamp to your work surface and has a ball joint to adjust the angle of the head. Other tools pictured here will come in handy here and there.
Make sure you get some goggles. I'm not saying that just because I'm a geezer. When drilling plastics in general, and Delrin especially, tiny curly shards of plastic will fly everywhere. If you're bending over real close because you're about to make a real vital cut, you'll find your entire face suddenly being showered with plastic. Sometimes you'll find a piece or two all the way across the room from where you were drilling! Plastic is not your friend when it's in your eye, let me tell you.
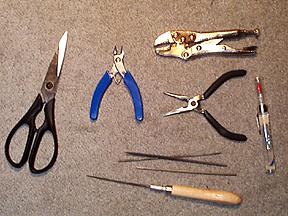
Can you tell we're at the bottom of the barrel here? I actually searched my pad for more tools I had used on Project EL BO. This is the last of what I could find.
For really fine filing, x-acto sells a needle file set which can be handy here and there. The lubricant there is available from Radio Shack, and unlike WD-40 is friendly to most plastics, although some don't need it, and it may harm some of your more exotic types.
Some of you may have noticed the absence of a hammer. Well, this is embarassing to admit, but I lost my hammer a while ago, and have made use of a big pair of vise-grips for the purpose since then...